Clean, Perfect Slices with Dental Floss — Cakes, Cheese and Rolls
Why this works
Unflavored, unwaxed dental floss is thin, strong and smooth, so it slides through soft foods without compressing them or dragging crumbs. Unlike a knife it doesn’t push or tear delicate textures, so layers stay even and surfaces stay clean.
What you’ll need
- Unflavored, unwaxed dental floss (or plain kitchen/butcher twine if unavailable)
- Ruler or toothpicks (for marking cake layer height)
- Clean hands or two helpers for larger items
- Optional: a thin offset spatula to stabilize cake layers
General step-by-step method
- Cut a length of floss roughly 1.5–2 times the diameter/length of what you’re slicing so you have room to hold both ends.
- Slide the floss under/around the item to the point where you want to cut. For a horizontal cake slice, hold the floss parallel to the table at the desired height. For vertical portioning (rolls, loaves), place floss straight down.
- Pull both ends of the floss taut and apply steady, even pressure. Walk the floss through the food — don’t saw. Keep the floss level for even slices.
- Remove the floss; discard and use a fresh piece for the next cut to avoid crumb transfer.
Specific uses and tips
Cake — create even layers
- Mark the cake with a ring of toothpicks at the exact height you want the cut (use a ruler to level).
- Slip floss around the cake at that height, hold taut, and rotate your cake stand or walk the floss around while pulling through.
- Use an offset spatula to lift the top layer once cut. Repeat for more layers.
Tip: For taller cakes, have a helper hold one floss end while you pull from the other side for a perfectly straight cut.
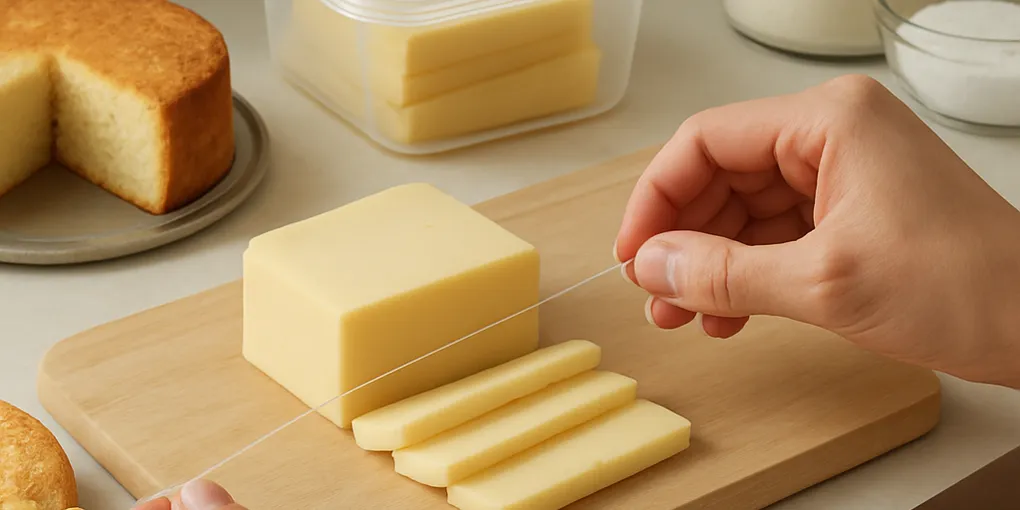
Soft cheeses — clean wedges without sticking
- Place floss under the cheese at the desired line and pull straight down.
- For wedges, use a radial pull from the center outward for even slices.
- Waxed or flavored floss may leave residue or flavor — always use unflavored, unwaxed floss.
Rolls, cinnamon rolls, and dough logs — exact portions
- Position floss perpendicular to the log at the exact spot and pull down.
- For sticky dough, dust the floss lightly with flour or cornstarch to reduce sticking.
- Use one floss per cut for tidy, uniform portions.
Brownies, bars and sticky items
- For neat bars, press floss straight down through the full depth, then lift.
- Replace floss after each cut to avoid dragging crumbs across subsequent pieces.
Safety and hygiene notes
- Use floss from a new, unopened container — don’t reuse floss from dental hygiene use.
- Avoid flavored floss (mint, cinnamon) — flavors can transfer.
- If you prefer entirely food-grade materials, use thin butcher’s twine, but expect a thicker cut line.
Final quick checklist
- Unflavored, unwaxed floss? Check.
- Proper length? Check.
- Even tension, steady pull? Check.
- Fresh floss per cut for the cleanest results? Check.
This simple swap—knife to floss—gives bakery-level presentation at home with almost zero extra cost or special tools.