Tension-Rod Lid & Cutting-Board Organizer — Double Your Cabinet Space
Why this hack works
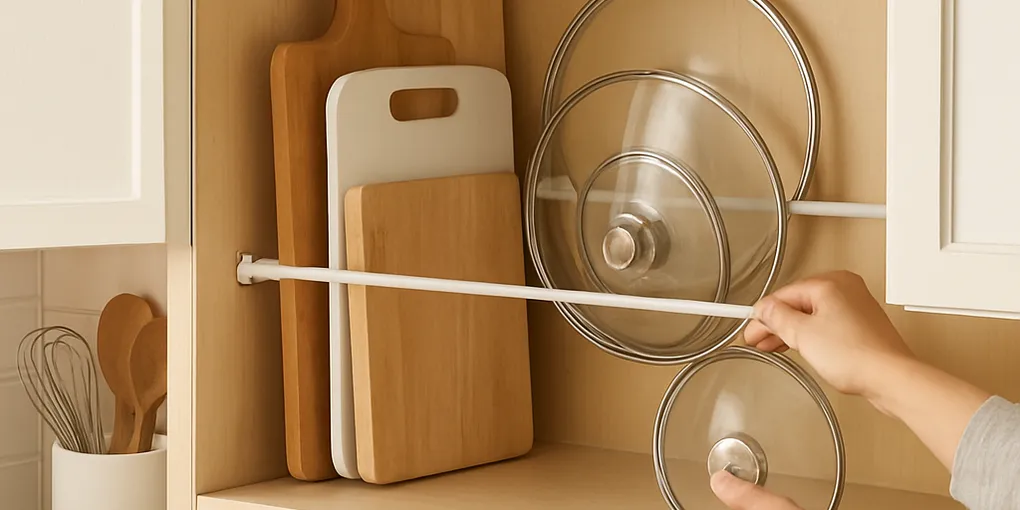
Most kitchen cabinets have unused vertical clearance or wasted space behind stacked pans. A single tension rod lets you store pot lids, cutting boards and thin baking sheets vertically so they’re visible, accessible and won’t slide into a jumble. It’s cheap, reversible and takes under 10 minutes.
What you need
- 1 adjustable tension rod (choose heavy-duty, 18–36 in/45–90 cm range depending on cabinet width)
- 4–6 medium binder clips or S-hooks (optional)
- A strip of shelf liner or thin foam/rubber (optional, to protect surfaces)
- A ruler or tape measure
- A pencil
Where this fits best
- Inside a lower cabinet beside the sink or stove
- Behind a pantry door or inside a tall kitchen cabinet
- In a cabinet with doors that fully open — not suited to roll-out drawers
Step-by-step setup
1. Measure and choose placement
- Empty the cabinet and clear the side wall where you’ll install the rod.
- Measure the internal width and height. Position the rod so there is about 1–2 in/2.5–5 cm of clearance above the tallest lids or boards you plan to store (this makes it easy to insert and remove items).
- Decide whether the rod will be vertical (for very wide cabinets) or horizontal (most common). Horizontal works best for lids and thinner boards; vertical works in shallow spaces for things like pan lids standing on edge.
2. Prepare surfaces (optional, recommended)
- Cut a small strip of shelf liner or thin foam/rubber and place it where each foot of the rod will press against the cabinet. This prevents scratches and gives extra grip so the rod won’t slip.
- Pencil-mark the intended height on both sides to ensure a level installation.
3. Install the tension rod
- Collapse the rod slightly, place one end against a cabinet side, then expand until it presses snugly against the opposite side.
- Twist or lock per the rod’s instructions until secure. The rod should be tight enough to hold weight without bending.
4. Organize lids and boards
- Arrange pot lids, cutting boards and baking sheets vertically, sliding them onto the rod so each rests against the rod and the cabinet floor or a small spacer (if you want them elevated).
- For small lids or thin pieces that might slip, clip a binder clip to the rim and hang that clip on the rod — the clip acts as a mini hook and prevents sliding.
- For heavier pans, use two parallel rods spaced a few inches apart for stability, or alternate orientation so handles sit against the cabinet face.
Variations and enhancements
Use S-hooks for handles
If lids or boards have handles with holes, hang them directly on the rod with small S-hooks for faster access.
Make a sliding “tray”
If you prefer everything to pull out, mount a narrow plywood or plastic strip on the cabinet floor parallel to the rod to act as a base. Items then slide easily forward while staying upright.
Multiple rods for zones
Install two rods at different heights — one for lids and one for cutting boards — so nothing crowds the other and you can group by function.
Troubleshooting
- Rod slips: Add extra non-slip liner under the rod ends, or choose a rubber-tipped rod designed for heavy loads.
- Too much wobble with heavy pans: Use two rods or move heavier items to a lower, sturdier storage location.
- Doors won’t close: Reposition the rod slightly lower or higher, or rotate boards/lids so they sit flush.
Quick maintenance
- Wipe lids and boards before storing to avoid transferring moisture.
- Every 3 months, check rod tension and reposition if you notice sagging.
Why you’ll love it
This setup creates instant visibility, cuts down time digging for the right lid, prevents scratched pans, and uses space you already have — all for under $20 and with no permanent changes to your kitchen.