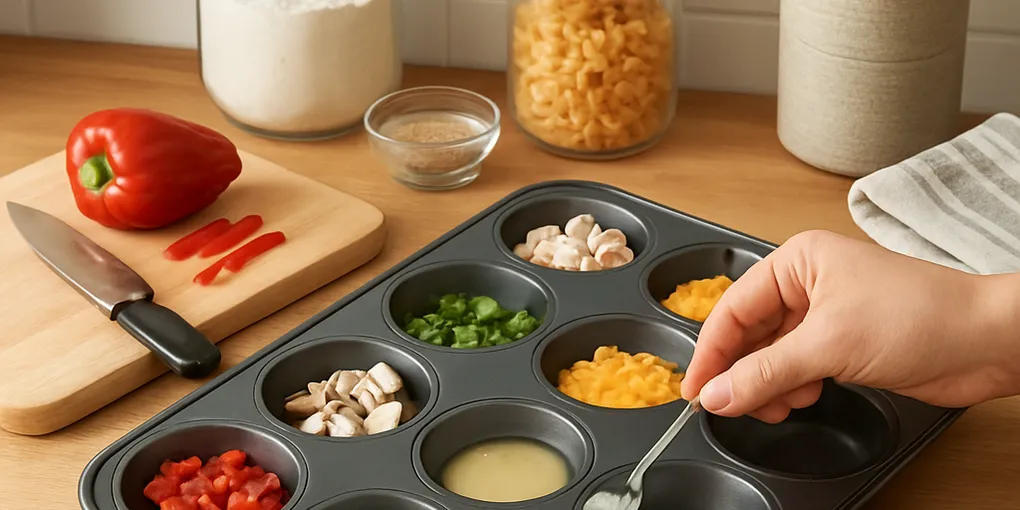
Muffin‑Tin Mise‑en‑Place — Turn a Muffin Tin into Your Ultimate Prep Station
Why this hack matters
A standard 6‑ or 12‑cup muffin tin is a compact, inexpensive, dishwasher‑safe tool that instantly replaces multiple prep bowls. It keeps small ingredients separated, portions controlled and your counter clutter down — ideal for weeknight cooking, batch prep and serving.
What you need
- One clean muffin tin (6‑ or 12‑cup, metal or silicone)
- Small spoons or measuring spoons
- A damp paper towel or small silicone liner (optional)
- Zip bags or cling film for longer holding (optional)
Step‑by‑step: Set up a muffin‑tin mise‑en‑place
1. Choose the right tin
Pick a tin size that fits your stovetop workflow — 12 cups for lots of small items, 6 cups for bigger portions (sauces, bigger chopped veg).
2. Clean and line (optional)
If ingredients are very wet or sticky, press small silicone liners into the cups or place one folded damp paper towel across several cups to keep herbs from drying.
3. Measure and place
Portion each ingredient into its own cup. Put spices, minced garlic, chopped onions, grated cheese, diced vegetables, and pre‑measured liquids in separate cups.
4. Organize the flow
Arrange cups in the order you’ll add them to the pan — left to right or top to bottom. If someone else is cooking with you, label cups with a small sticky note for clarity.
5. Refill or cover
If you need to hold items for longer than 10–20 minutes, cover the tin with cling film or pop it in the fridge wrapped in a towel.
8 brilliant uses with quick how‑tos
1. Weeknight dinner mise‑en‑place
Portion ingredients for a stir‑fry — 1 cup soy mix, 1 cup garlic/ginger, 1 cup veg, 1 cup protein. Cook straight from the tin to the pan.
2. Topping and garnish station for tacos or bowls
Fill cups with chopped cilantro, lime wedges, sliced radish, diced onion, shredded cheese. Place tin at the table for self‑serve.
3. Sauce sampler / tasting
Pour small amounts of different sauces or vinaigrettes into cups for quick tasting and seasoning before committing.
4. Baking mix‑ins and decorations
Line the cups with parchment or silicone and stash chocolate chips, nuts, sprinkles and candied fruits while baking.
5. Single‑serve freezing
Fill cups with small portions of leftover rice, mashed potatoes or sauces, freeze, then pop out and store in a labeled bag for single‑serve reheating.
6. Quick egg bites or mini frittatas
Grease cups, whisk eggs with fillings in the tin, bake for portable breakfasts — no extra bowls needed.
7. Kid-friendly snack tray
Serve cut fruit, cereal, cheese cubes and dips in a tin for an instant, portioned snack tray that’s easy to pick up.
8. Cocktail or mocktail garnish station
Offer citrus wheels, mint sprigs, cherries and ice cubes in a tin for fast cocktail assembly.
Cleaning and storage tips
- Metal tins: wash promptly or soak if oils get tacky. Dishwasher safe for most.
- Silicone tins: flexible for popping out frozen portions; dishwasher safe.
- To store prepped food longer, transfer from tin to airtight containers or resealable bags and label with date.
Why it works (and why it’s better than bowls)
- Cup walls prevent spills and cross‑contamination between ingredients.
- Small portions reduce washing — one tin vs multiple bowls.
- The compact footprint keeps counters clear and creates a visual cooking sequence.
Quick variations and pro tips
- Use two tins for complex recipes to separate wet and dry ingredients.
- Line cups with parchment for sticky items like honey or nut butter.
- For very small items (capers, seeds), use a silicone liner or spoon them into the cup to avoid losing anything.
- If you need heat resistance, use a metal tin — silicone is best for freezing and popping out portions.
Final note
A muffin tin is a tiny, versatile mise‑en‑place station that saves time, reduces dishes and makes cooking less stressful. Keep one near your prep area and you’ll reach for bowls far less often.